

The holidays are a wonderful time to gather with loved ones, family and friends. These gatherings often include the traditional exchanging of holiday gifts. This year, do not strain your budget by purchasing an expensive, mass-produced item. Instead, consider making handmade holiday gifts that will wow the recipient, while also saving you money.
Woodworking projects make excellent handmade holiday gifts. They are durable, high-quality and offer a variety of projects for those with different skill levels. Whether you’re a carpenter or someone who has never crafted woodworking projects before, there are many great gift ideas with detailed instructions that are easy to follow.
These 15 woodworking projects will help you create meaningful, memorable and unique handmade holiday gifts.

Wood Slice Ornaments
These easy-to-make wood slice ornaments are the perfect gift for a friend. All you need is a saw, a 2- to 3-inch diameter wooden log, 400 grit sandpaper, eyehooks, a thumbtack, pliers, twine, clear sealer spray, a permanent marker and a printer. Don’t worry if you can’t cut the wood slices yourself. Many craft stores have small wood slices available for an affordable price.

First, use a saw to cut a 0.5-inch slice from the wooden log. Then sand the flat sides of the wooden slice. Next, push a thumbtack into the top, center of the wooden slice. This is where you want your ornament to hang from, so make sure you align the thumbtack correctly before pushing it into the wood.
Then use a pair of pliers to twist the eyehooks into the hole you created with the thumbtack. Cut a 4-inch piece of twine and tie it through the eyehook. Download these graphics for a quick transfer design or illustrate your design using a permanent marker. Lastly, spray the clear sealer over the ornament and let it dry.

Chevron Wooden Earrings
Here is the perfect gift for a teenager or the fashionista in your life. These hip earrings are perfectly on trend with their chevron patterned wood and 1970’s vibe.
These are the supplies you need to get started on this simple project: a drill and standard drill bit, two wooden discs from a craft store, wood glue, chevron stencil, wood stain, mod podge, four jump rings and two earring hooks. Start jewelry-making your way toward handmade holiday gift success.

Wooden Serving Tray
This elegant wooden serving tray is sure to impress your friends. The best part of this woodworking project is that the entire tray construction requires no screws or nails. It just needs some glue with serious holding power.
Pick up some wood scraps that are the same length, but different widths and colors, at a woodworking shop or craft store. Line the stack of wood in the order you want them to be on the tray. Use a miter saw to cut the stack at an angle, and when you get to a corner, use a tape measure and pencil to mark it off, line up the saw and then cut.
Assemble the cut stack into the shape of a rectangle when finished cutting. Measure the rectangle of the slanted strips and cut a piece of plywood in that size. Next, glue the strips of wood to the plywood and wait half an hour for it to dry.
Then cut four triangular wooden pieces for the feet of your tray. Glue these to each of the bottom corners of the tray. Once that glue has dried, measure and drill the holes for the tray handles.
Turn the tray over, line the edges of the rectangle in painter’s tape and use epoxy glue to fill in any gaps between the wooden slabs. Take a straight-edge razor and brush it over the glue to smooth it out.
Sand down the wood and epoxy surface. Apply a coat of polyurethane over the tray and wait for it to dry. Now, affix the handles and take some time to admire this fantastic holiday gift you created.

Wooden Beer Tote
This tote is the perfect handmade gift for the beer-lover that you know. A wooden beer tote will make it easy for the gift recipients to carry their favorite brew back from the beer garden or local brewery.
This project would be easy for an intermediate woodworker, but it does require close-attention from someone who is just starting out. Follow the tutorial here to learn how to make this trendy yet functional holiday gift.

Rustic Wall Clock
This do-it-yourself clock is the perfect gift for someone with a new home, a practical sensibility or a lover of rustic décor. At 4-feet high, this clock will also make an enormous impact. It is also an easy and inexpensive woodworking project that does not require a saw.
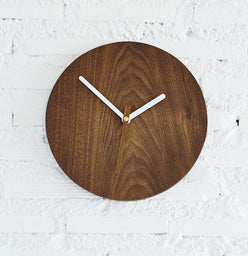
Assemble these supplies: 12 1”x6” wooden slabs, screws, painter’s tape, a tape measure, level, screwdriver, four different paint stains and a clock kit with large metal numbers and clock hands.
Sand down nine wooden slabs and fill any holes or cracks in the wood with a wood repair kit. Paint the pieces with four different wood stains.
Once they dry, glue the nine wooden slabs together. Next, brace two vertical and one horizontal wooden pieces to the back of the clock using screws.
Using a level, measuring tape and a pencil, measure the hour intervals around the clock from its center. Assemble painter’s tape over each hour, marking until you have all 12 marked in the tape.
Glue the metal numbers onto their correct positions around the clock and then install the clock kit on the back, as well as on the clock hands. This beautiful handmade holiday gift will literally be used each minute of every day.

Tooty Fruity Truck for Kids
Here is an easy-to-make toy crate that can be used to carry toys. This project is so simple to follow that you can even have the kids join in on the fun of making it.
You will need a reliable hot glue gun to create this fun children’s gift.

Wood Salt and Pepper Shakers
No matter for whom you are handmaking a gift, everyone needs to eat and enjoys a little seasoning with their meal. These wood salt and pepper shakers are an excellent gift for anyone on your holiday list.
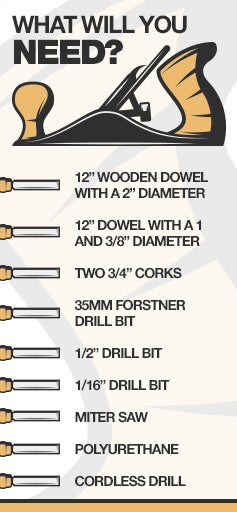
This gift requires a 12” wooden dowel with a 2” diameter, a 12” dowel with a 1 and 3/8” diameter, two 3/4” corks, a 35mm Forstner drill bit, 1/2” drill bit, 1/16” drill bit, a miter saw, polyurethane and a cordless power drill. The first step is to cut the 2” diameter dowel into two 4” pieces. These will serve as the bases of your salt and pepper shakers.
Using the 35mm drill bit and hollow out the dowel. Drill about 3.5” deep and slowly remove all wooden shavings. Repeat this step for the other 4” wood piece.
Turn the dowel over and using your 1/16” drill bit, drill three evenly-spaced holes at the top of one dowel for the salt shaker. Flip the other dowel over and drill five aligned holes on the top for the pepper shaker.
Then sand the inside and outside of each dowel carefully. The other 1 3/8” dowel will now be used to fill the cavity of the shakers. Drill the inside about 1” deep until you reach the desired diameter needed to fit into the carved-out area of the shakers neatly. Carefully cut the end of the carved-out dowel in a 3/4” slice.
Push the cork into the ring. Put glue around the outside of the ring and push it into the open cavity of the shaker, far enough so that the cork is recessed slightly from the bottom edge of the dowel. Do the same to the other shaker as well.
Paint and design the shakers, and then brush over them with a coat of polyurethane. Use a wood repair kit to fill in any gaps you find. Now, these salt and pepper shakers are ready to be presented to a friend.

Wooden Chess Board
Here is a gift for the genius in your family. Impress your loved ones with this sophisticated, hand-crafted chess board.
For those experienced enough to attempt this lovely handmade chess board, here is the full tutorial for you to follow. Hopefully, the recipient of this gift challenges you to a game of chess afterward.

Lazy Susan
A Lazy Susan is a convenient turntable placed in the center of a table to help easily distribute food. They were extremely popular in the 1950s and most recently, they are making a come-back. This is a fabulous handmade gift for a friend who enjoys hosting guests, or for someone with a large family to feed.
Assemble a prefabricated round piece of pine wood, a rotating plastic spice holder, wood stain and bonding glue. Place down a cloth and stain the round piece of wood. Let it dry overnight.
Use this recommended product to glue plastic to wood when affixing the top of the rotating spice rack to the bottom of the round wood. Let it dry overnight, and in the morning, your handmade holiday gift is ready to be wrapped.

Tiny Wooden USB Drive
Here’s a beautiful-yet-functional gift that any computer nerd will enjoy: a tiny wooden USB drive. This easy project only requires the use of a saw, chisel, sandpaper, a drill and of course, a USB drive.
Consider etching the recipient’s name into the wood for a more personalized touch.

Wood Filigree Frame
Leave it to Martha Stewart to provide a tutorial for creating a luxuriously embellished frame. This wood filigree frame looks so well-assembled and lavish that your friends might wonder if you really handmade it. This project requires no heavy saws or power tools and is excellent for a woodworking beginner who has a detailed eye for crafts.
The materials needed for this project include wood filigree, a utility knife, tweezers, spray paint primer, craft paper, paint, two popsicle sticks, a small tray, clear-drying craft glue, clamps with rubber tips and a foam brush.

Cut pieces of the wood filigree with a utility knife into two 7 ½” pieces for the length and two 6” pieces for the width. Spray with paint primer and let dry.
Decide whether you want the frame and filigree to be the same painted color. Use the tweezers and dip the filigree into the diluted paint. Tap any excess paint off, blot the filigree with craft paper and then let it dry.
Repeat this step for all four pieces of filigree. Dip the frame into the preferred paint color and let that dry as well.
Fill the small tray with craft glue and brush it onto the filigree with the foam brush. Affix all four pieces of filigree to the frame. Clip them to the frame and let this dry overnight.
Once dry, insert a photo of you and the recipient, or of them and their family. Consider what photograph would be most meaningful to them.

Cornhole Boards
Cornhole is a portable, backyard game that can be played by adults and children of various ages. The fun-loving gift recipient will be wowed by this custom, handmade cornhole set.
If you are up to the challenge of creating cornhole boards by hand, here is the link.

Birch Candles
These birch candles are extremely popular at evening events and to create a tranquil ambiance in your home. Gift this handmade item to a friend or family member who deserves some relaxation around the holidays.
Do not worry if you don’t have access to birch branches. They can be bought online or at specialty wood or craft stores.
Cut the birch branch into varying pieces between 4 and 8 inches. Use a 1.5” Forstner bit to drill a 1” deep hole in the center at the top of each piece. Dip each piece into flame retardant. Once dry, place a small tealight candle into each one.
Group candles of varying heights together, and decorate with twine, ribbon or evergreen spears. Now the candles are ready to be given as a gift to a loved one.

Laptop Chalkboard
This laptop chalkboard project will be just as fun for you to create as it will be for a child to play with. While a table saw and router are needed to make this woodworking gift, no power tools are required, and the directions are straightforward to follow.
Rip your 1/2” sheet of plywood down to 11” with a table saw, then cut that into two 8.5” sheets. Set your router to 1/4” depth and cut each sheet to the specifications shown in the tutorial. One will serve as the base of the laptop where your chalk is stored, while the other will serve as the chalkboard itself.
Paint the laptop to your preferred color, stain it and let it dry. Then attach the hinges, so the chalkboard is on the top, and your chalkboard laptop is all ready to be gifted to a creative child.

Embellished Wood Pencil Box
This embellished wood pencil box is a great gift for a coworker or ambitious friend. This pencil box will keep the gift recipient organized, and its unique design will stand out on any desk.
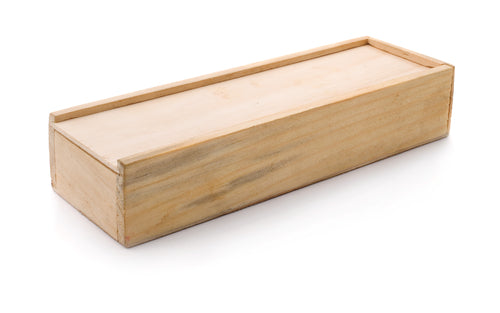
For this project, you will need a 4″ x 6″ x 6″ wood block, sandpaper or a power sander, a drill with a 1/4″ boring bit and a regular drill bit, a hammer, 2–3 boxes of brass escutcheon pins, 5/8” box wire brads, clear waterproof polyurethane, a clamp and a paintbrush.
Clamp the wood block onto a stable surface and use your small drill bit to make a small hole where you want the pencils to be held in the block. Use the ¼” boring bit to drill the holes 3” deep. Afterwards, sand the block down repeatedly using different sandpaper grades until it is very smooth.
Flip the block over to empty out any sawdust and carefully sand each hole. Use a pencil to draw out a design. Then hammer the escutcheon pins and wire brads into the pattern.
Once you are happy with the design, stain the wood and then paint it with the polyurethane. Insert pens and pencils into the block, box it up and wrap it.